
 HAPPY HALLOWEEN!!
October 31, 2008
October 28, 2008
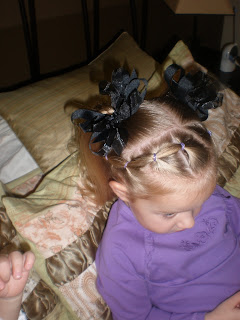
Does the bow look TOO big? Maybe - but it's too cute not to wear.
 First, I divided the hair in half & put elastics only in one half. Then bring it all into a pony, only the ponies from that half. With the other half, I brought up all the hair in that section.
 Make your bun (sorry kinda blurry)
 Blow dry the hair straight & add your big bow!! That's it!! It was really fast today.
 side view
October 25, 2008
french braid tutorial...finally!!
Hooray!! It finally worked. I tried showing this the best I could, but it would have taken forever if I went all the way down. Let me know if you need a better explanation - I'm just excited this finally posted:) I forgot to show this: usually when I'm done with the braid, I smooth the hair with the comb to smooth out all the bumps, then spray it with hairspray.
Big Bow Sale
Everyone needs to head on over to Oh So Girly (www.ohsogirly.blogspot.com) She is having an awesome sale on bows right now. Check it out. Tons of the cutest bows & they are only $1. So head over there before they're all gone!!
October 23, 2008
I'm not blogging as often as I would like & I'm sorry. I feel like I've been doing the same things over & over or similar things. So I want to know what you guys want to see. I am still trying to upload the frenchbraiding video. & I have on my list to show the corkscrew braid (twist braid) & inside-out frenchbraid. But what else do you guys want to see?
After many issues with my computer & then with blogger, I am finally able to upload this post that I've been trying to do all day. I went to also post the frenchbraiding video - but blogger was encountering problems. I promise it's coming!!
What we came up with today:
It kind of looks like a less than sign (remember in math the alligator chomps or the lesser # - i know - pretty stupid - probably shouldn't even write that incase I'm wrong:)
 The easiest way to do this is to part the hair horizontally in half. Add in elastic in the bottom half to keep it out of the way of the top.
 Next, add your first elastic. Add it at an ANGLE. You only bring the hair up from the half way line (remember it's pulled back - so you don't want to add it yet)
 Then I braided the pony tail & added an elastic.
 Pull your next section up & include the braid in it & add the elastic. Take the rest of the braid out.
 I alternated between braid & puffy braid all the way down.
 Right before you get to the splitted part, your pony should be as far over as you can put it. Let down the rest of the half & turn the hair so it starts going down the other way at an angle. Still remembering to alternate with braid & puff braid.
 Spray to hold & add a cute bow. I kept going all the way to the end of the hair, even though I wasn't adding any more ponies. I added the bow at the last puffy braid closest to the head.
 & that's it. If I didn't have as much time - I would have stopped at the half way mark & just kept the rest of the hair down. But that's what's so fun about hair - you can be as creative as you want & do what you want. You don't have to go by what I tell you.
October 21, 2008
Cross-Over Braids
I'm sorry I haven't posted anything in a few days. I've actually been trying to post the video on french braiding but I think I may have a virus on my computer & it keeps booting me off. So I'm going to try on another computer & get it up for those of you who want to see it. I also had a few requests on doing the inside-out french braid (the braid i did today) & the corkscrew twist (twist braid). In the future I will show those on a video also.
Here's today:
 First, part the hair straight down the middle.
 Next, part the hair in half. Pull two opposite sides up & secure with elastic. You are going to be french braiding at an angle with what is left out.
 Start your braid, start at an angle.
 It really is easier than what you think - you just don't grab any of the hair in the elastics & that keeps it easy.
 Let down the rest of the hair & start braiding that side at an angle, also. If I were to do this again, I would try to make where they meet in the middle & cross just a little higher. That has to do with the way you part the hair in half.
 When I was crossing over, I had no more hair to grab until I got to the other side, so I did a few braids without pulling hair up into it & then continued doing a normal french braid once there was hair to pull up again. It may not make sense until you try it yourself.
 front view:
 Take a comb to the side & smooth out any bumps. Spray to hold. I dried the ends of her hair & curled them under. Where her cross over was lower than what I would have liked - I didn't add bows so it didn't cover the cross-over. If it was higher, I would have added some.

 front view:
 Take a comb to the side & smooth out any bumps. Spray to hold. I dried the ends of her hair & curled them under. Where her cross over was lower than what I would have liked - I didn't add bows so it didn't cover the cross-over. If it was higher, I would have added some.
October 16, 2008
Braided Bun
 Part the from the part down to the ear & pull the rest back in a pony. This is what you are going to french braid.
 French braid all the way down.
 Pull the rest into a pony tail.
 Now bring the braid into the pony but have to go over, across it (like shown) so it looks like the braid is wrapped & keeps going with the bun. Add elastic to secure it.
 So I forgot to flip this picture & too late now. Sorry!! Braid the pony tail & braid as far down that you can.
 Wrap the braided pony into a bun. If bobby pins help along the way, use them. I used an elastic to secure it at the base. I didn't want any of the ends of the hair showing so I tucked it under the elastic so you couldn't see it.
 Add a cute bow & you are finished.

***If you are interested in me showing a video tutorial on how to do a french braid - please leave a comment.
October 15, 2008
Braided Piggies
 Divide the top in 3 sections.
 Braid the 2 sides & leave the middle straight.
 Divide the middle in half & add to pony along with a braid crossing over it.
 Do the same to the other side.
 Braid the piggies & flip the braid over so it is in half & add your elastic.
 I sprayed the ends a little so they flipped over the ponies & looked curled. You could use a curling iron if that's easier for you.
October 14, 2008
curly pony
This was really easy. It's just 4 ponytails closer together to make it look like one big one.
 You need to divide the hair in four sections. I parted each of mine like a triangle so they all came together in the middle.
 Make your way around the head adding your elastics.
 Do all four piggies like that.
 Then I just curled her hair. I added a bow just on the top one but you could add it on the 2 sides instead, if you like it better.
 front view:
October 13, 2008
Elastic Head Band
This just adds a little something to regular pigtails. & it also keeps from a normal headband from keep falling out.
 I parted her hair on a slant. Then work on one side, dividing small section & adding your elastics to make the headband. Once I got to where the hair layed over the elastic, I parted the headband then clipped the rest of the hair up so I could see what I was doing.
 Repeat the same thing on the other side of the part.
 Once you get to the bottom, you'll want to bring the 2 pieces altogether along with the middle section. It looks off centered but her head is just tilted. Try to make at as centered as possible.
 Bring the 3 pieces together with an elastic.
 Make your pigtails. Remember when you add the section from the end of the headband to divide it in half & add to each of your piggies
 Add some cute bows
 I flipped her ends out with a curling iron & sprayed to hold. That's it!!

 I parted her hair on a slant. Then work on one side, dividing small section & adding your elastics to make the headband. Once I got to where the hair layed over the elastic, I parted the headband then clipped the rest of the hair up so I could see what I was doing.
 Repeat the same thing on the other side of the part.
 Once you get to the bottom, you'll want to bring the 2 pieces altogether along with the middle section. It looks off centered but her head is just tilted. Try to make at as centered as possible.
  Bring the 3 pieces together with an elastic.
 Make your pigtails. Remember when you add the section from the end of the headband to divide it in half & add to each of your piggies
 Add some cute bows
 I flipped her ends out with a curling iron & sprayed to hold. That's it!!
Subscribe to:
Posts (Atom)